Crafting
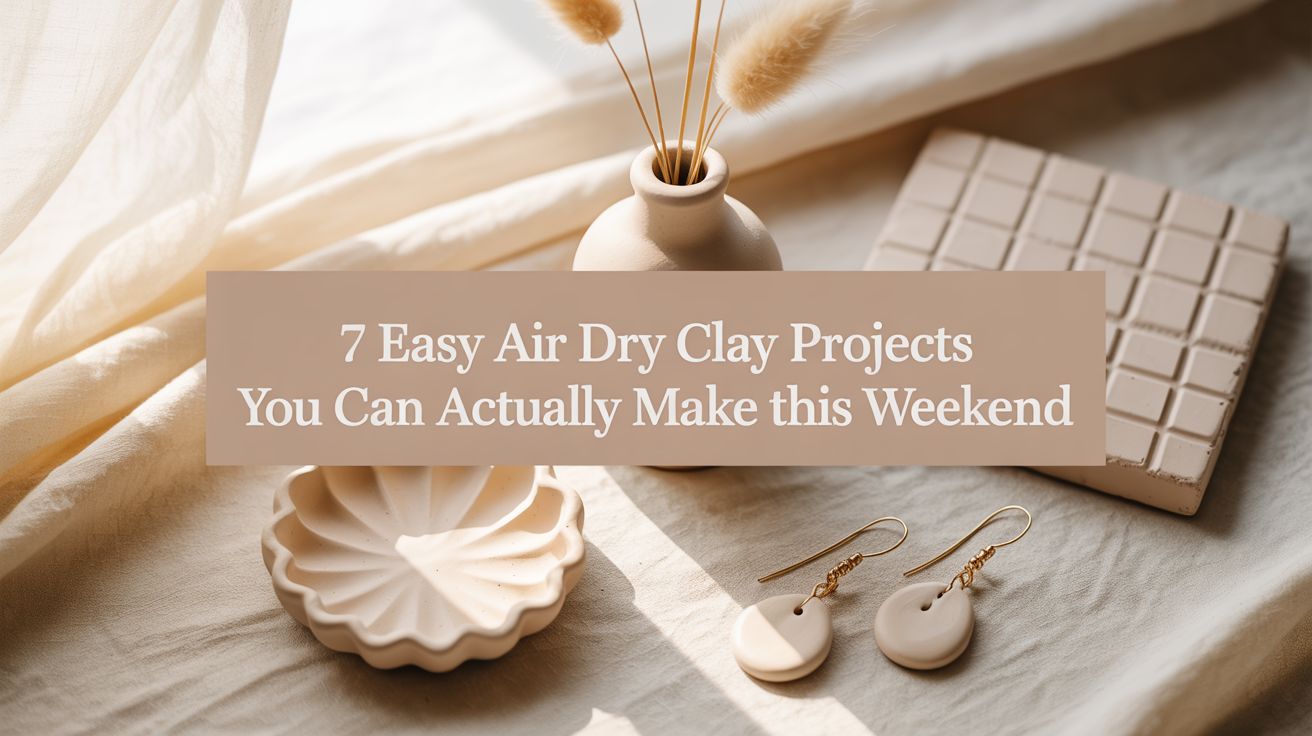
7 Easy Air Dry Clay Projects You Can Actually Make This Weekend
If you’ve ever saved a air dry clay craft pin and then thought “yeah right, I could never do that,” I want you to hear me: you absolutely can.
Air dry clay projects are genuinely one of the most beginner-friendly crafts out there, and the best part is you don’t need a pottery wheel, a kiln, or a single art class on your resume. All you need is a bag of clay, a flat surface, and a free afternoon.
I picked up my first bag of air dry clay on a whim one Saturday and walked away two hours later with a little wobbly trinket dish and a full-blown obsession.
As an Amazon Associate, I earn from qualifying purchases. Some of the links in this article are affiliate links. This means that, at zero cost to you, I will earn an affiliate commission if you click through the link and finalize a purchase.
The thing about working with clay is that it slows you down in the best way. You can’t rush it. You’re just in it, shaping something with your hands, and it feels really good.
These seven air dry clay projects are organized to take you from the absolute basics all the way up to a wall hanging you’d genuinely be proud to display.
Each one comes with real step-by-step instructions so you actually know what you’re doing, not just a pretty picture and a vague suggestion to “shape the clay.”
What You Might Need
Before you start, grab a few basics. You won’t need all of these for every project, but having them on hand makes the whole experience smoother.
- Air dry clay in white or terracotta
- Rolling pin or smooth glass bottle
- Cookie cutters or a craft knife
- Wooden skewer or toothpick for detail work
- Small bowl of water for smoothing edges
- Fine grit sandpaper for finishing
- Acrylic paint and a small brush
- Clear acrylic sealer or Mod Podge
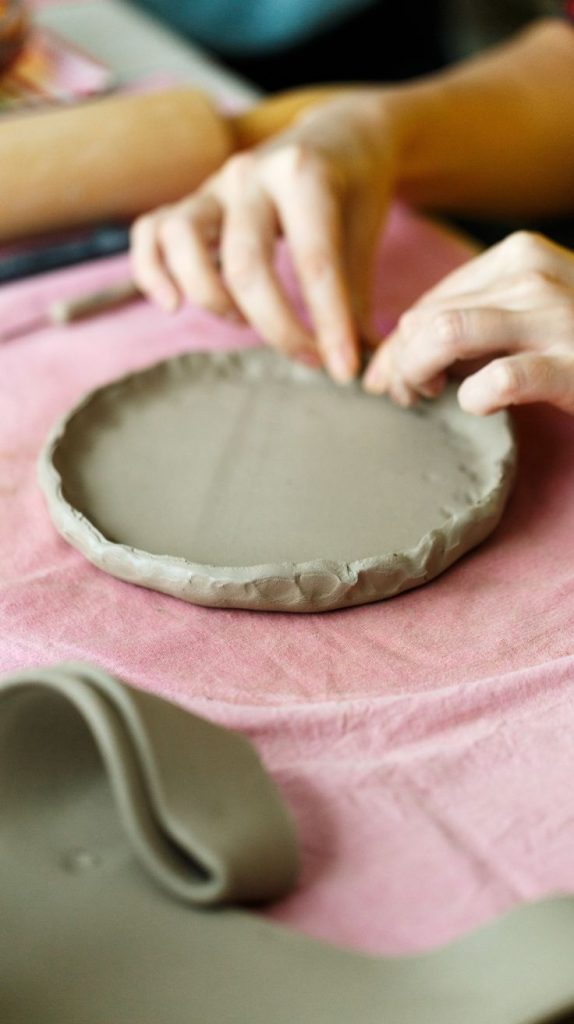
1. Mini Trinket Dish
Skill level: Total beginner. Time: About 45 minutes, plus drying time.
Technique: Slab method. You roll the clay flat, cut a shape, and drape it to form the sides. Think of it like rolling out cookie dough and pressing it into a mold. That’s genuinely all it is.
This is the perfect first air dry clay project because it teaches you how clay behaves without requiring any real technique. Your dish will be a little uneven and slightly imperfect, and that is exactly what makes it beautiful.
How to Make It:
- Knead your clay for a couple of minutes to warm it up and remove any air bubbles. This prevents cracking later.
- Use your rolling pin to roll it out to about a quarter inch thickness on a smooth, lightly dampened surface.
- Cut a circle or square shape using a cookie cutter or by tracing around a small bowl with your craft knife.
- Gently lift the clay shape and press it down into a small bowl or ramekin, letting the edges fold up naturally. Don’t force it or it’ll crack.
- Smooth any rough edges with a damp finger. Let it dry completely inside the mold for 24 to 48 hours so it holds its curved shape.
- Once dry, sand any rough spots lightly, paint, and seal.
Shop It: A white air dry clay starter kit on Amazon that includes basic shaping tools is the easiest way to get going. Look for kits that specifically mention smooth, crack-resistant clay for beginners.
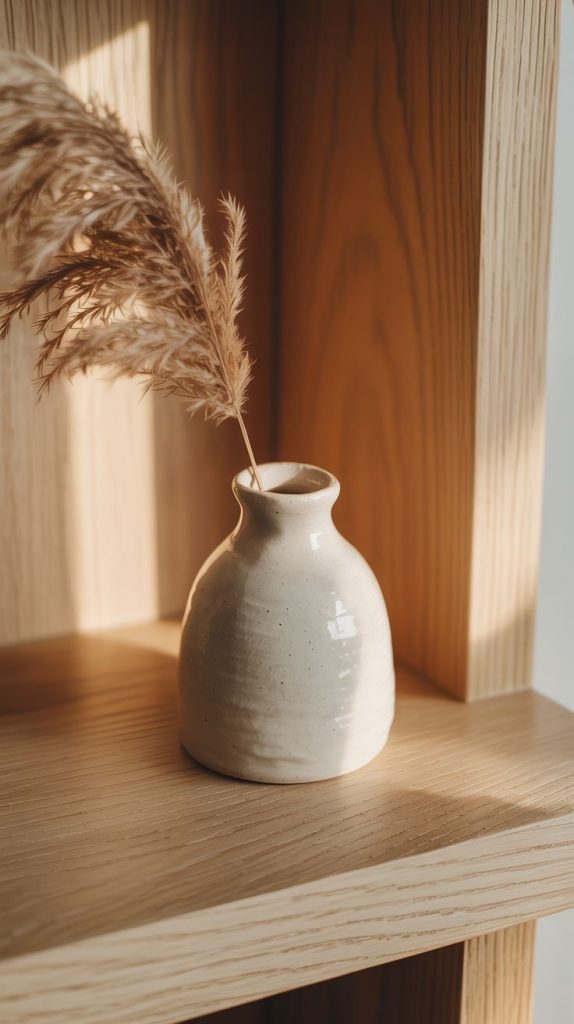
2. Pinch Pot Vase
Skill level: Beginner. Time: About one hour, plus drying time.
Technique: Pinch pot method. This is the oldest clay technique in existence and it requires zero tools. You start with a ball of clay, push your thumb in, and pinch. That’s it. The pinch pot method is how humans have been making vessels for thousands of years, and it works beautifully for small decorative vases.
These look stunning filled with a few dried stems or a single sprig of pampas grass. Keep them small since air dry clay doesn’t love prolonged water exposure.
How to Make It:
- Roll a ball of clay about the size of a golf ball. Smooth it between your palms until it’s even.
- Press your thumb straight down into the center of the ball, stopping about a half inch from the bottom. You don’t want to push through.
- Begin pinching the walls between your thumb on the inside and your fingers on the outside, rotating the ball slowly as you go.
- Work your way up gradually, keeping the walls an even thickness throughout. Thin spots will crack as they dry.
- Once you have the shape you want, smooth the outside with a damp finger to close any small cracks.
- Set it upright on a flat surface and let it dry for 48 hours. If the rim flares out more than you’d like, gently press it inward while still soft.
- Sand, paint, and seal when fully dry.
Shop It: Dried pampas grass bundles on Amazon look absolutely gorgeous in a small handmade pinch pot vase. The feathery, airy texture plays beautifully off matte clay.
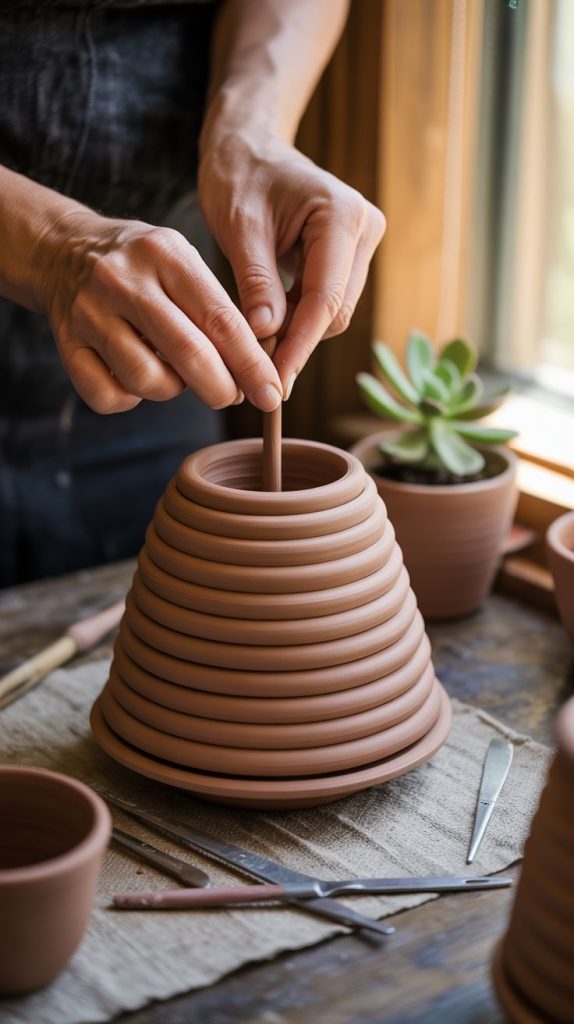
3. Coiled Flower Pot
Skill level: Beginner to intermediate. Time: One to two hours, plus drying time.
Technique: Coil building. You roll long ropes of clay and stack them in circles, smoothing the seams as you build upward. This technique gives you more height and control than the pinch pot method, which makes it perfect for a small flower pot.
One important heads-up: air dry clay is porous, so use a small plastic cup or liner inside any pot that will hold actual soil and water. The clay itself won’t hold up to constant moisture without a liner.
How to Make It:
- Start with a flat base. Roll a small ball, flatten it into a thick circle about three inches across, and smooth the edges. This is your base.
- Roll a long rope of clay between your palms, aiming for an even thickness roughly the width of a pencil.
- Coil the rope around the edge of the base, pressing it firmly down to attach. Smooth the inside seam with your finger or a small tool.
- Roll another rope and stack it directly on top of the first coil. Press and smooth the seam on the inside again. The outside can stay textured if you like the look, or smooth it for a cleaner finish.
- Continue stacking coils until your pot reaches the height you want. Keep the walls slightly inward at first and then angle them outward for a classic pot shape.
- Smooth the rim by rolling a thin coil and pressing it along the top edge, then blending it in.
- Let dry for 48 to 72 hours since this is a thicker piece. Sand and seal before use, and place your liner inside before adding soil.
Shop It: Terracotta-colored air dry clay on Amazon gives your coiled pot that classic earthy warmth without any paint needed. It looks beautiful exactly as it comes out of the bag.
4. Textured Wall Tiles
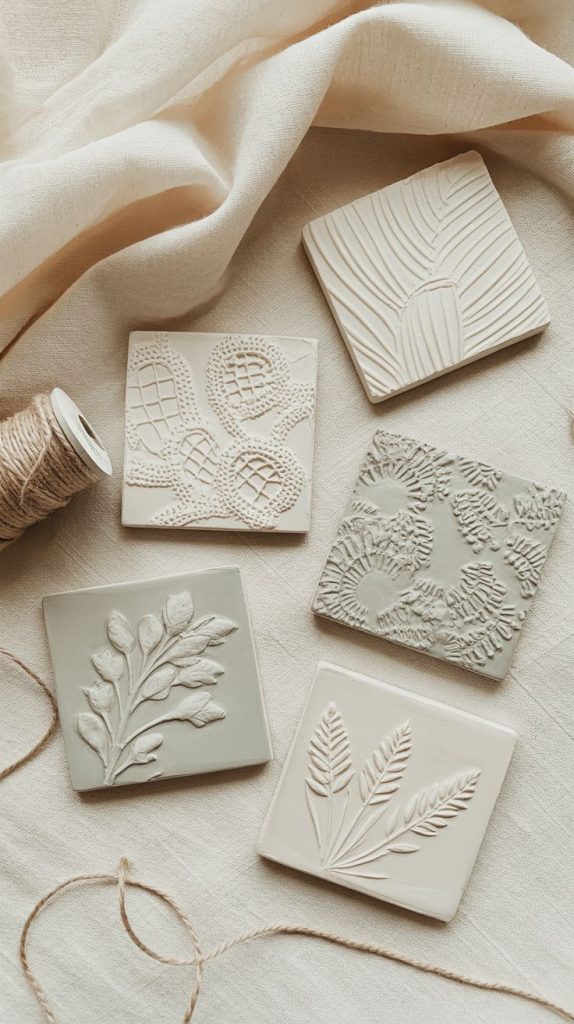
Skill level: Beginner. Time: 30 minutes per tile, plus drying time.
Technique: Slab plus texture impression. You roll flat slabs of clay and press objects into the surface to create pattern. The magic here is in what you press into it. Lace, bubble wrap, the bottom of a woven basket, a crumpled paper bag, a fork, a rubber stamp — all of these leave gorgeous impressions in soft clay.
These tiles look like something you’d spend real money on in a boutique home goods store. Grouped on a wall, they create a textural moment that’s genuinely impressive.
How to Make It:
- Roll your clay out to about a half inch thickness for tiles, since thinner tiles are more likely to warp as they dry.
- Press your texture source firmly and evenly into the surface. For lace, lay it flat on top and roll over it gently with your rolling pin, then peel it away slowly.
- Cut your tile shape using a craft knife. Squares and rectangles are easiest, but organic shapes look beautiful too.
- Use a skewer to add a small hole near the top if you plan to hang them.
- Lay the tiles flat on a piece of parchment paper and let them dry undisturbed for 48 hours. Flip them halfway through drying to prevent warping.
- Sand any rough edges and paint in a single tone to let the texture do all the visual work. Seal well.
Shop It: A lace ribbon roll on Amazon is one of the most versatile texture tools you can own for clay work. Press it into soft clay, peel it back, and the pattern left behind looks intricate and intentional every single time.
5. Stamped Clay Ornaments
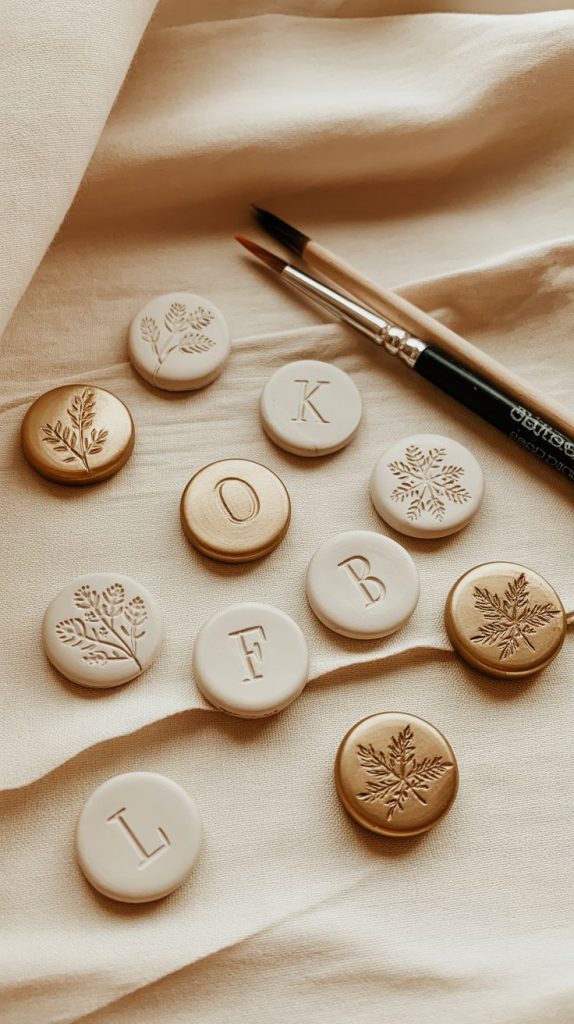
Skill level: Beginner. Time: 30 to 45 minutes, plus drying time.
Technique: Slab method plus stamping. Same rolled slab approach as the tiles, but cut into smaller decorative shapes and stamped with letter or design stamps. These work year-round, not just at Christmas. Hang them in a window, from a plant hook, along a mantle, or string them together as a garland.
The single most important thing to remember with ornaments: poke your hanging hole before the clay dries. I have made this mistake more than once.
How to Make It:
- Roll your clay to about a quarter inch thickness. Thinner than tiles since these are decorative, not structural.
- Press your stamp firmly and evenly into the clay surface. Letter stamps work beautifully for words, initials, or short phrases. Floral and leaf stamps give a botanical feel.
- Cut your shapes using cookie cutters or a craft knife. Circles, ovals, small arches, and simple stars all work well.
- Use a skewer to poke a clean hole near the top, at least a quarter inch from the edge so it doesn’t crack.
- Lay flat on parchment and dry for 24 hours, flipping once.
- Sand lightly, paint, and seal. Thread with linen twine or gold cord to hang.
Shop It: An alphabet stamp set for clay crafts on Amazon gives you clean, crisp letterforms that press beautifully into soft clay. Look for sets that include both uppercase and lowercase letters for maximum versatility.
6. Clay Earrings
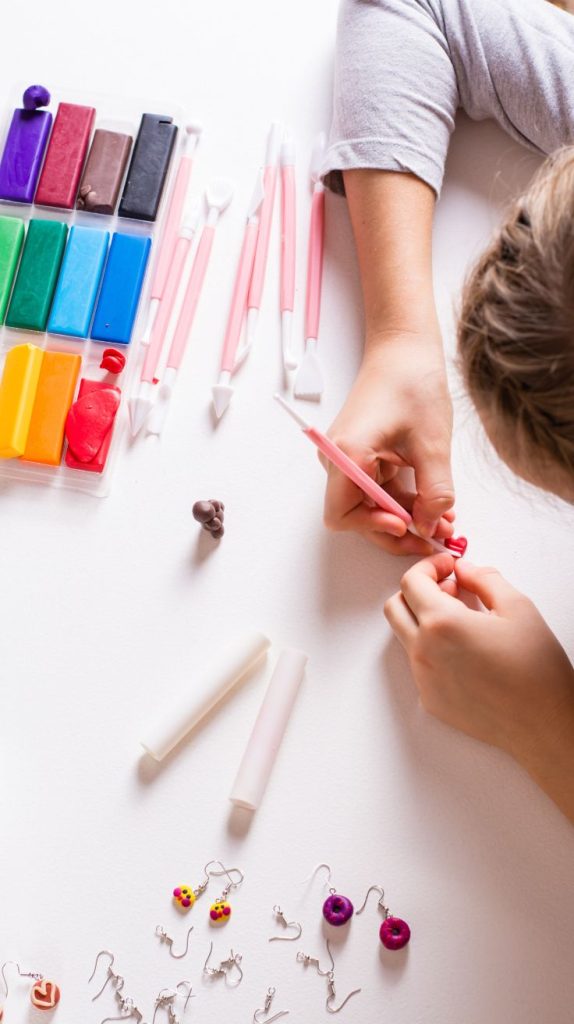
Skill level: Beginner. Time: 45 minutes, plus drying time.
Technique: Thin slab cutting plus jewelry finishing. Clay earrings have had a massive moment in handmade jewelry and they’re genuinely achievable as a beginner. Air dry clay works well for occasional wear pieces as long as you seal them thoroughly. If you want earrings for heavy daily wear, polymer clay is more durable, but for the purpose of learning the craft and making something wearable and beautiful, air dry clay is a great starting point.
How to Make It:
- Roll your clay very thin, roughly an eighth of an inch. Earrings need to be lightweight or they’ll pull uncomfortably.
- Cut your shapes using small cookie cutters or a craft knife. Simple shapes work best: circles, small rectangles, soft arches, or teardrops.
- Use a toothpick to press a small decorative design into the surface if you’d like detail.
- Poke a clean hole near the top of each piece with a skewer, making sure both holes are in the same position on each earring so they hang evenly.
- Let dry completely flat for 24 hours on parchment paper.
- Sand any rough edges very gently since these are small and delicate.
- Paint with acrylic paint and apply two coats of sealer, letting each coat dry fully. Attach earring hooks using jump rings and jewelry pliers.
Shop It: An earring hardware kit on Amazon that includes hooks, jump rings, and a small pair of jewelry pliers gives you everything needed to finish your pieces without hunting down supplies separately.
7. Boho Clay Wall Hanging
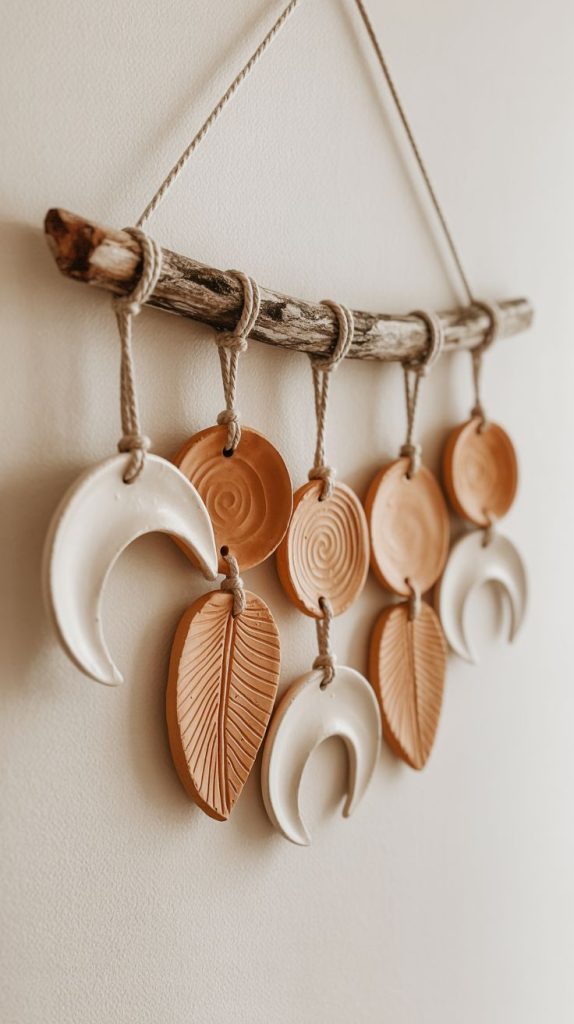
Skill level: Intermediate. Time: Two hours, plus drying time.
Technique: Combined slab and freehand sculpting, plus assembly. This is the graduation project. You’ll use everything you’ve learned in the previous six projects: rolling slabs, cutting shapes, pressing textures, poking holes, drying carefully, painting, and sealing. Then you assemble the finished clay pieces onto a piece of driftwood with twine to create a wall hanging that looks like a genuine boutique purchase.
This one takes the most patience but delivers the most reward.
How to Make It:
- Roll out your clay and cut a variety of shapes: leaf forms, simple circles, crescent moons, small oval discs. Aim for eight to twelve pieces of varied sizes.
- Press different textures into each piece using lace, stamps, or a toothpick for carved details. Variety in texture is what makes the finished piece feel rich and layered.
- Poke two small holes near the top of each piece for threading. Make sure both holes are evenly placed.
- Lay all pieces flat on parchment to dry for 48 hours, flipping halfway through. Thicker pieces may need longer.
- Sand, paint in a cohesive palette (warm whites, terracotta tones, and natural clay color work beautifully together), and seal each piece well.
- Cut lengths of natural twine, varying from six to fourteen inches. Thread a length through each clay piece and knot securely.
- Tie the finished pieces along a piece of driftwood or a wooden dowel rod, varying the heights so they cascade unevenly. Space them across the full width of the wood.
- Add a longer piece of twine across the top of the driftwood for hanging.
Shop It: Natural driftwood pieces on Amazon save you the beach-combing step and give you a smooth, flat piece with beautiful grain character that makes the whole hanging look finished and intentional.
Start Your Air Dry Clay Projects This Weekend
Air dry clay projects reward you in a way that very few crafts do. You start with a lump of nothing and end up with something genuinely beautiful sitting on your shelf or hanging on your wall.
No wheel, no kiln, no experience needed. You learned seven real techniques today: slab rolling, pinch pots, coil building, texture pressing, stamping, thin slab jewelry work, and assembly. That’s a real foundation.
Start with the trinket dish if you want a quick win this afternoon. Work your way up to the wall hanging when you’re ready to make something that stops people in their tracks. However you start with your air dry clay projects, I promise the hardest part is opening the bag.
Frequently Asked Questions About Air Dry Clay Projects
Do I really need any special tools to start? You can make your first few projects with things already in your kitchen: a glass bottle as a rolling pin, a butter knife for cutting, a fork for texture. A basic tool kit helps as you progress, but nothing is required on day one.
How do I keep my clay from cracking as it dries? Dry your pieces slowly at room temperature away from direct sunlight or heat vents. Cracks usually happen when clay dries too fast or unevenly. If you see a small crack forming, press it closed with a damp finger while the clay is still slightly soft.
How long does air dry clay take to dry completely? Thin pieces like earrings and ornaments dry in 12 to 24 hours. Thicker pieces like coiled pots and wall tile shapes need 48 to 72 hours. When in doubt, wait an extra day before painting or the moisture trapped inside can cause paint to peel.
What paint works best on air dry clay? Acrylic paint is the go-to choice. It adheres well, comes in every color imaginable, and dries quickly between coats. Always follow with a sealer, because unsealed acrylic on clay will scratch and chip over time.
Is air dry clay waterproof after sealing? Sealing adds significant water resistance but air dry clay is never fully waterproof the way kiln-fired ceramics are. For flower pots, always use a plastic liner inside. For decorative pieces that won’t see moisture, a good acrylic sealer is plenty of protection.
Can I fix a mistake after my clay has dried? Small chips and cracks can be filled with a little fresh clay mixed with water to a paste consistency, then sanded smooth once dry. Major structural breaks are harder to fix, but for decorative pieces, a little imperfection honestly adds to the handmade charm.
Where is the best place to buy air dry clay? Craft stores like Michaels and Hobby Lobby carry it, and Amazon is great for buying in bulk if you plan to make several projects. White air dry clay and terracotta are the two most popular colors, and both take paint beautifully.
