
Crafting
How to Make DIY Aroma Stones That Make Your Home Smell Amazing Naturally

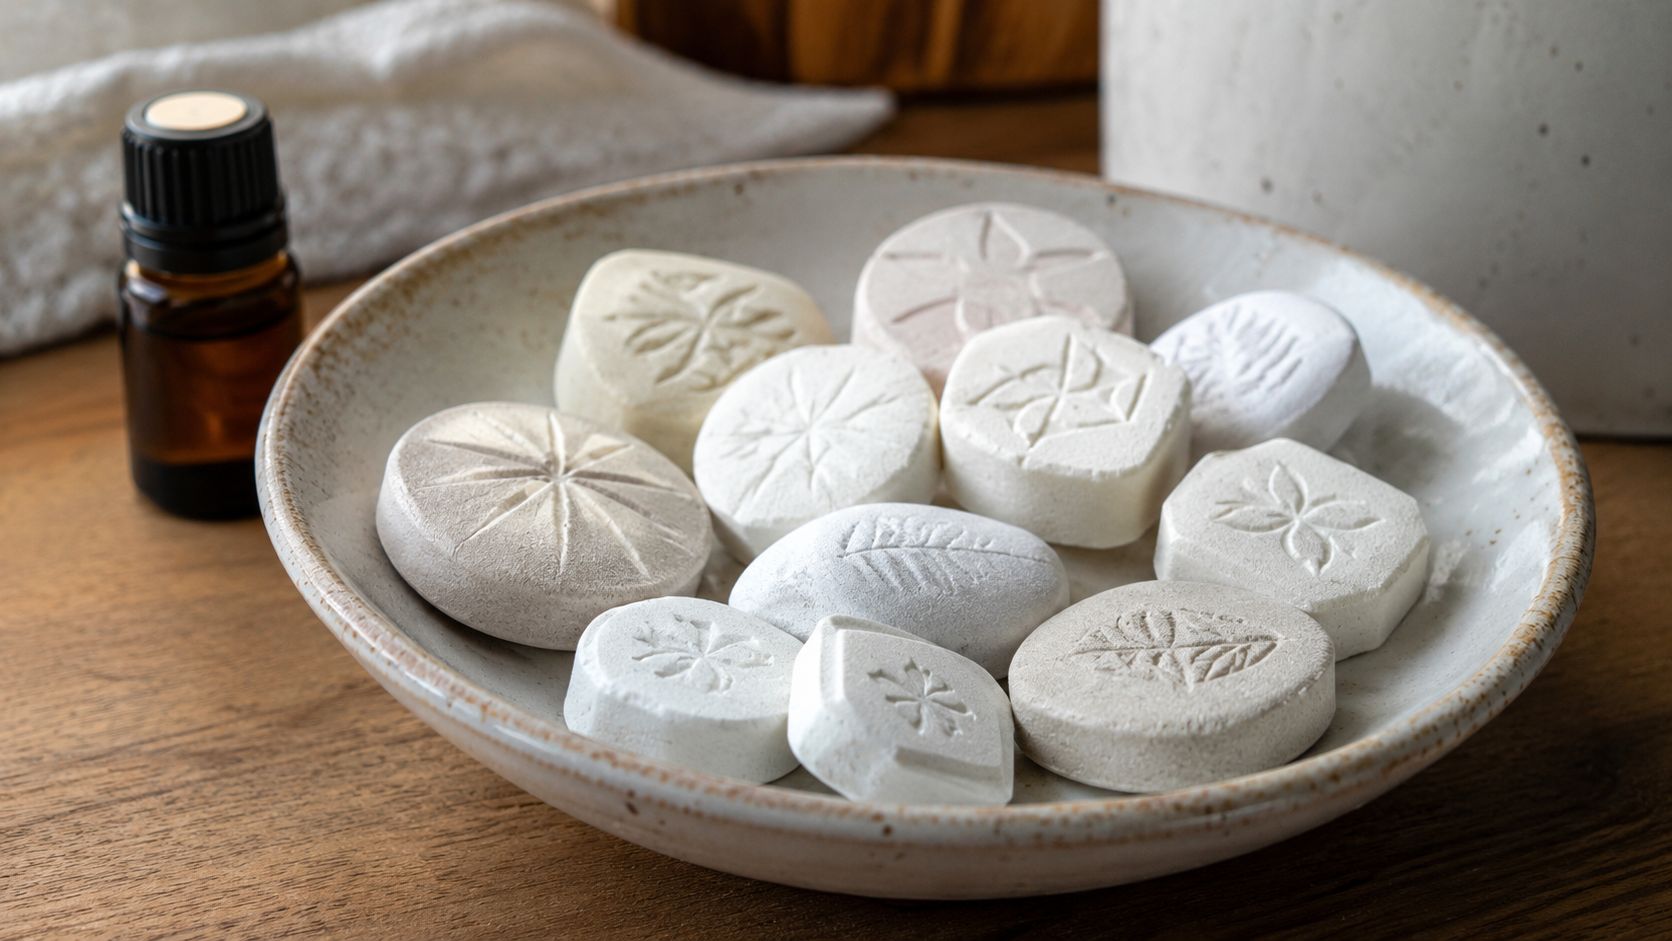
DIY aroma stones are one of those crafts that look impressive, smell incredible, and are honestly way easier to make than most people expect.
If you’ve been relying on synthetic air fresheners or expensive reed diffusers to keep your home smelling fresh, this is your sign to try something more natural, more beautiful, and way more satisfying to make yourself.
As an Amazon Associate, I earn from qualifying purchases. Some of the links in this article are affiliate links. This means that, at zero cost to you, I will earn an affiliate commission if you click through the link and finalize a purchase.
These little scented stones double as decorative stones you’ll actually want to display, and once you understand the basic technique, you can customize them endlessly for every room, every season, and every person on your gift list.
What You Might Need
Before you get started, gather these supplies. Most of them are easy to find at craft stores or online.
- Plaster of Paris or air-dry clay (both work beautifully as porous stones that absorb essential oils)
- Water
- Essential oils of your choice
- Silicone molds (soap molds, ice cube trays, or decorative molds all work)
- Mixing bowl and spoon
- Optional: dried botanicals, mica powder, or food coloring for decoration
- Optional: sandpaper for smoothing edges once dry
What Are DIY Aroma Stones and How Do They Work
Aroma stones, sometimes called diffuser stones or fragrance stones, are porous objects made from materials that absorb and slowly release essential oils into the air.
Think of them as a passive, flameless alternative to scented candles or incense sticks. You simply add a few drops of your favorite essential oil blend directly onto the stone, and it does the rest, releasing a soft, steady natural fragrance into your space over time.
The science behind them is simple. Porous materials like plaster of Paris or unglazed ceramic have tiny air pockets that trap fragrance molecules and release them slowly as air passes through.
This makes them incredibly efficient as natural air fresheners because there’s no flame, no electricity, and no synthetic fragrance required. They’re also endlessly reusable. When the scent fades, you add more oil.
Choosing the Right Base Material for Your Scented Stones
The material you use will determine how porous your stones are, how long they hold fragrance, and how they look when finished.
Plaster of Paris is the most popular choice for beginners because it’s inexpensive, easy to work with, and sets up quickly. It creates a smooth, matte finish that absorbs essential oils beautifully.
Air-dry clay is another excellent option, especially if you want more control over the shape and texture. It takes longer to dry but allows for more detailed molds and a slightly more refined finished look.
Some crafters also use a baking soda and cornstarch mixture, which creates softer, more chalky fragrance stones with a lovely texture.
How to Style It:
- Use plaster of Paris for clean, geometric shapes that look polished in a modern home
- Try air-dry clay for organic, rounded shapes that suit a boho or farmhouse aesthetic
- Add a drop of mica powder to your mixture before pouring for a subtle shimmer effect
Shop It: Look for Plaster of Paris Craft Mix on Amazon. It comes in large quantities for a low price, sets quickly, and is the go-to base for beginner aroma stone makers who want consistent, professional-looking results.
How to Mix and Pour Your Aroma Stone Base
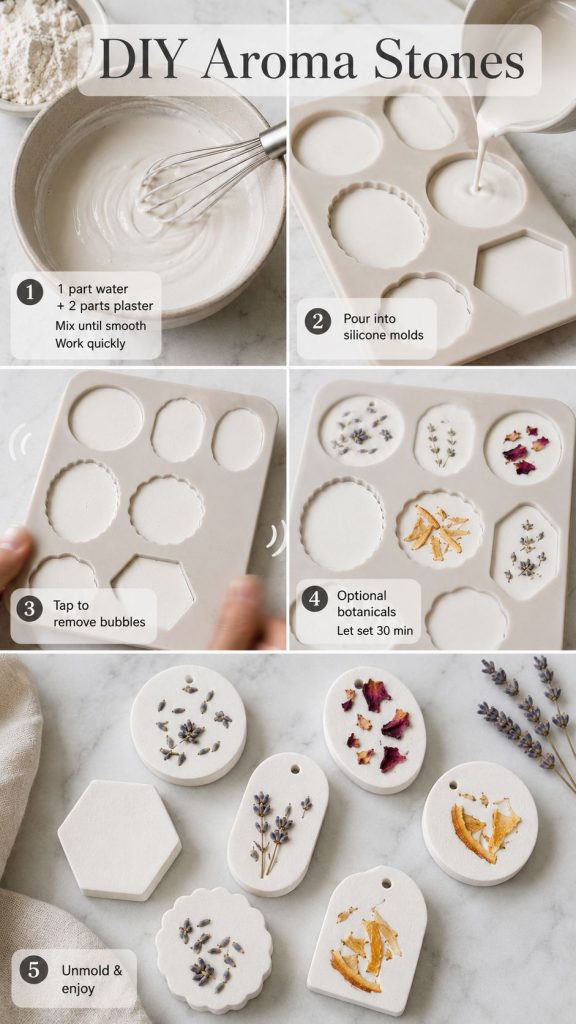
This is where the magic happens, and it’s genuinely not complicated.
For a basic plaster of Paris batch, you’ll mix one part water with two parts plaster until you get a smooth, lump-free consistency similar to pancake batter.
Work quickly because plaster begins to set within a few minutes of mixing.
Pour your mixture into silicone molds and tap them gently on the counter to release any air bubbles.
You can press dried botanicals like lavender buds, rose petals, or citrus peel into the surface at this stage for a decorative touch.
Let the stones sit undisturbed for at least 30 minutes before attempting to unmold them.
How to Style It:
- Use heart-shaped molds for handmade gifts
- Pour into hexagonal molds for a modern, geometric scented decor display
- Press a small loop of twine into the back before it sets so your stones can hang in a closet or car
Shop It: Silicone Soap Mold Set These flexible molds come in dozens of shapes and sizes, release cleanly every time, and work for everything from aroma stones to candles and soap.
Drying and Curing Your Fragrance Stones
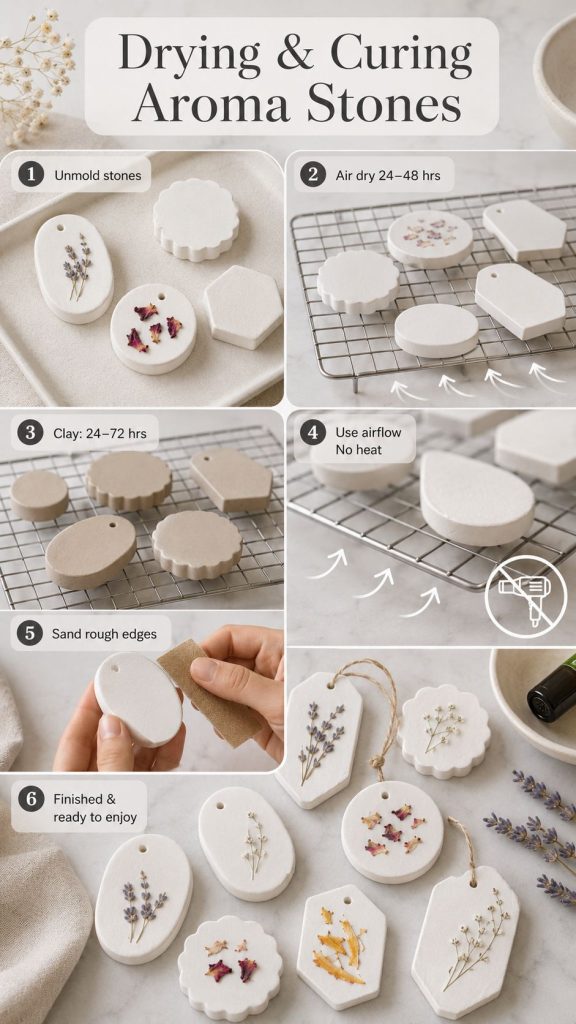
Once you’ve unmolded your stones, the work isn’t quite done. Plaster of Paris stones need to dry fully before you add any essential oils, or the fragrance will compete with the moisture still evaporating from the stone and won’t absorb properly.
Let them air dry at room temperature for a minimum of 24 hours, though 48 hours is better.
If you’re using air-dry clay, plan for a longer drying time, anywhere from 24 to 72 hours depending on thickness. You can speed things up by placing stones on a wire rack to allow airflow underneath, but don’t use a heat source because rapid drying can cause cracking.
Once fully cured, run a piece of fine sandpaper gently over any rough edges. This small step makes a big difference in how finished and polished your homemade gifts look.
Choosing the Best Essential Oils for Home Fragrance

This is honestly the most fun part. The essential oils you choose will define the entire personality of your aroma stones, so it’s worth thinking through which scents work best for each space.
Lavender is a classic choice for bedrooms because of its association with relaxation and stress relief.
Eucalyptus and peppermint work beautifully in bathrooms, creating a spa-like, clean-air feel.
Citrus oils like lemon, orange, and grapefruit are energizing and fresh, making them a natural fit for kitchens and home offices.
For a more complex, sophisticated scent, try blending oils rather than using a single note. A popular aromatherapy blend for home fragrance is lavender, bergamot, and a touch of cedarwood. It’s warm, calming, and layered in the best possible way.
How to Style It:
- Label your stones with a small tag so guests or gift recipients know which essential oil blend to use for reapplication
- Create a seasonal rotation: citrus blends for spring and summer, warm spice blends for fall, and evergreen or frankincense for winter
Shop It: Look for a Set of Pure Essential Oils Sampler Kit on Amazon. These sets typically include anywhere from 14 to 32 individual oils and give you the chance to experiment with blending before committing to a signature scent.
How to Add Scent to Your Aroma Stones
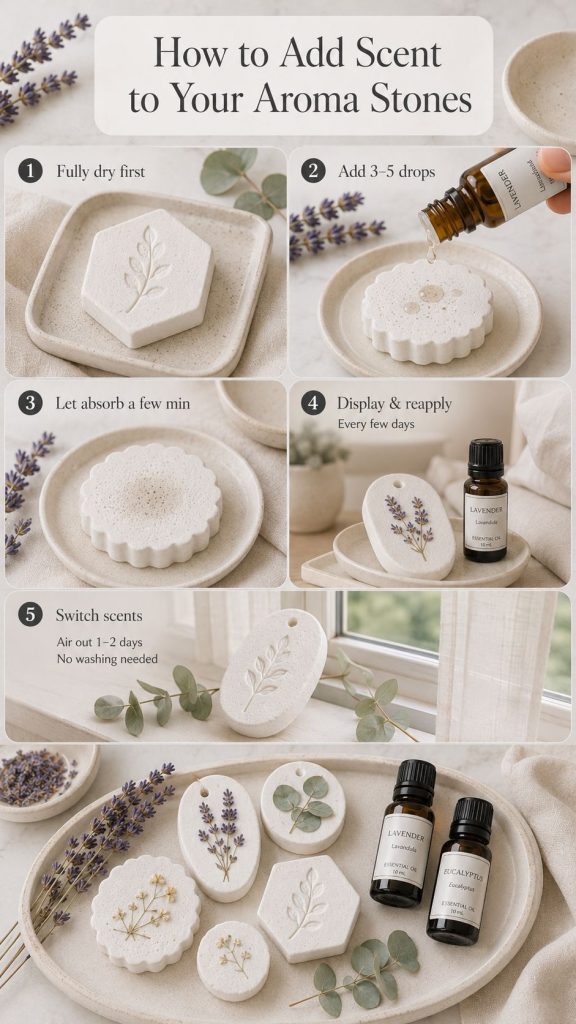
Once your stones are fully dry, applying the essential oil is simple. Place your stone on a small dish or tray and add three to five drops of your chosen oil directly onto the surface. Let it absorb for a few minutes before moving the stone to its display spot.
For the first application, you might notice the stone absorbs the oil almost immediately. That’s normal and a sign you have a beautifully porous stone.
Subsequent applications won’t absorb quite as fast because the stone will already carry some residual scent. Reapply every few days or whenever the fragrance starts to fade.
If you want to switch scents, simply leave the stone in a well-ventilated spot for a day or two until the previous fragrance dissipates. Your stone will be ready for a fresh scent without any washing required.
Decorating and Finishing Your Scented Decor

Plain white stones are beautiful in a minimalist way, but there are so many options for taking your scented decor to the next level.
Before pouring, you can tint your base mixture with a few drops of food coloring or cosmetic-grade mica powder for soft, pastel stones that look like they came from a boutique.
After drying, you can add delicate hand-painted details with acrylic paint.
Pressed flowers or dried herbs embedded in the surface before the mixture sets add a botanical, artisan feel that makes these stones look genuinely high-end.
Wrap a finished stone in a small square of linen tied with twine and you have one of the most thoughtful handmade gifts you can give.
How to Style It:
- Display a cluster of scented stones in a small wooden bowl or tray on your coffee table
- Tuck stones into dresser drawers to keep clothing smelling fresh naturally
- Place them in closets, bathrooms, or near entryways as subtle natural air fresheners
Shop It: Search for Dried Flower Petals for Crafts on Amazon. These mixed botanical sets are perfect for pressing into the surface of your stones before they set, adding color and texture without any painting required.
Displaying Your DIY Aroma Stones Around Your Home
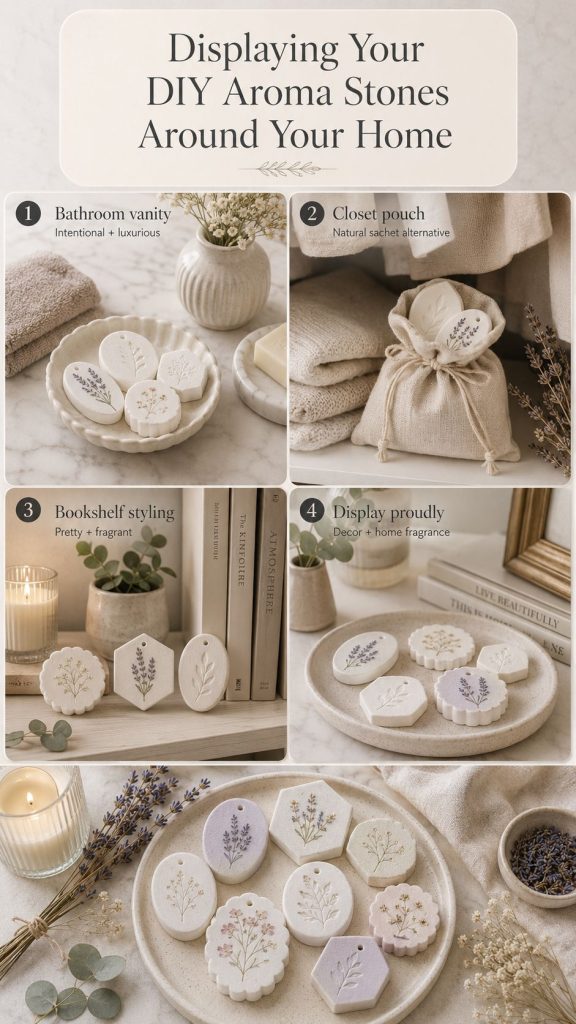
Once you’ve made a batch of fragrance stones, the fun is figuring out where to put them all.
A small ceramic dish of scented stones on a bathroom vanity looks both intentional and luxurious.
A linen pouch filled with stones tucked into a closet works as a completely natural alternative to synthetic sachets.
A few stones arranged on a bookshelf between plants and candles look like something out of a home spa catalog.
The beauty of scented home accessories like these is that they enhance a space both visually and aromatically. They’re not hidden away like plug-in air fresheners. They’re displayed proudly as part of your decor.
Gifting DIY Aroma Stones as Handmade Gifts
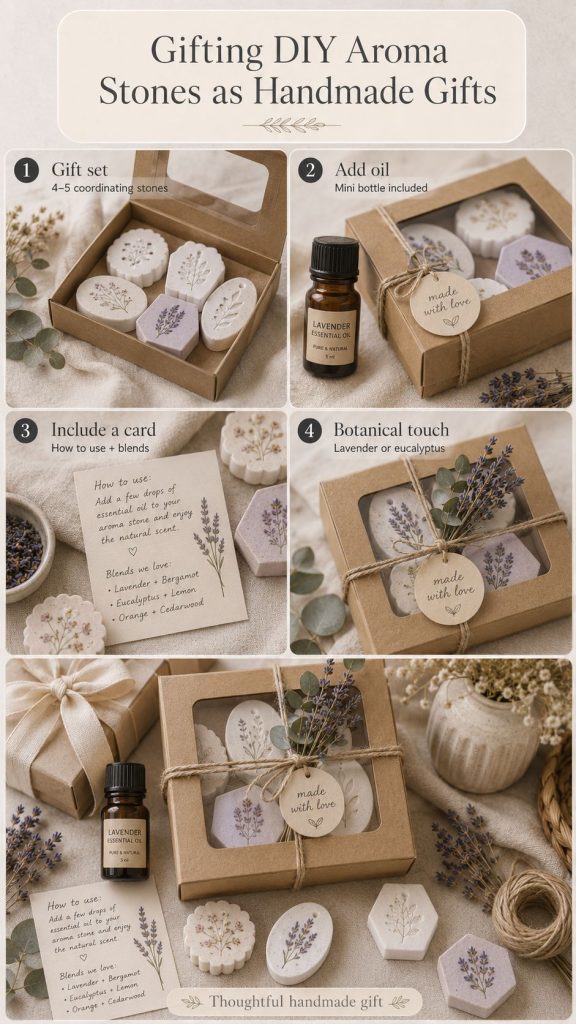
Aroma stones are genuinely one of the best handmade gifts to give because they’re useful, beautiful, and feel personal.
A set of four or five stones in coordinating colors, packaged in a small box with a mini bottle of essential oil and a handwritten card explaining how to use them, is the kind of gift people remember.
They’re perfectly suited for birthdays, housewarmings, holidays, teacher appreciation, and wellness-themed gift baskets. Make a batch in someone’s favorite scent and you have something that feels thoughtful without requiring a huge time or money investment.
How to Style It:
- Package in a kraft paper box with a window lid so the stones are visible
- Include a small card with suggested essential oil blends for different moods
- Add a sprig of dried lavender or eucalyptus to the packaging for an extra botanical touch
Shop It: Look for Small Gift Boxes with Window Lids on Amazon. These kraft paper boxes are the perfect size for a set of aroma stones and give your handmade gifts a polished, boutique-style presentation.
Troubleshooting Common DIY Aroma Stone Problems
Even simple crafts have their quirks. If your stones are cracking during drying, the mixture was likely too thick or dried too quickly. Try a thinner pour next time and keep them out of direct sunlight while drying.
If your stones aren’t absorbing essential oil well, they may not be porous enough, which can happen if the plaster-to-water ratio was off.
If the scent fades faster than expected, try applying oil to slightly warm stones, as warmth helps open the pores and allows deeper absorption.
You can warm a stone for 20 to 30 seconds in a barely warm oven (turned off) or simply let it sit in a sunny window for a few minutes before applying oil.
Making DIY Aroma Stones Part of Your Natural Home Routine
DIY aroma stones fit beautifully into a broader shift toward a more natural, intentional home. Once you’ve made your first batch and seen how easy and affordable they are, it’s hard to go back to synthetic air fresheners.
These little fragrance stones become part of your rhythm: refreshing the scent on Sunday, rotating blends with the seasons, making a new batch as gifts when the holidays roll around.
The best part is that you control every single ingredient. No synthetic chemicals, no artificial dyes, no mystery fragrances. Just pure essential oils, simple materials, and a craft that genuinely makes your home a better place to be.
Frequently Asked Questions About DIY Aroma Stones
How long do DIY aroma stones hold their scent?
It depends on the material and the oil used, but most stones hold fragrance for several days before needing a refresh. Heavier oils like sandalwood and cedarwood tend to last longer than lighter citrus oils.
Can I use fragrance oils instead of essential oils?
Yes. Fragrance oils work well in aroma stones and often last longer than pure essential oils. Keep in mind that fragrance oils are synthetic, so if you’re making natural air fresheners specifically, stick to pure essential oils.
Are aroma stones safe around pets?
Some essential oils are toxic to cats and dogs, including tea tree, eucalyptus, and certain citrus oils. Research pet-safe essential oils before displaying stones in areas your pets frequent.
What’s the best mold to use for beginners?
Silicone ice cube trays or silicone soap molds are the easiest starting point. They’re flexible, release cleanly, and come in a huge variety of shapes.
How do I clean aroma stones if I want to change the scent?
You don’t need to wash them. Simply leave them in a well-ventilated area for 24 to 48 hours and the old scent will dissipate naturally before you add a new oil.
Can kids help make aroma stones?
Absolutely, with supervision. The mixing and pouring steps are simple enough for older kids, and choosing essential oil scents is a fun sensory activity. Just handle the essential oils yourself as they can irritate skin.
How many drops of essential oil should I use?
Start with three to five drops per stone. You can always add more, but it’s easier to build up than to deal with an overpowering scent. Smaller stones need fewer drops than larger ones.