Crafting
7 Craft Ideas For Adult Craft Night That Are A Lot Of Fun
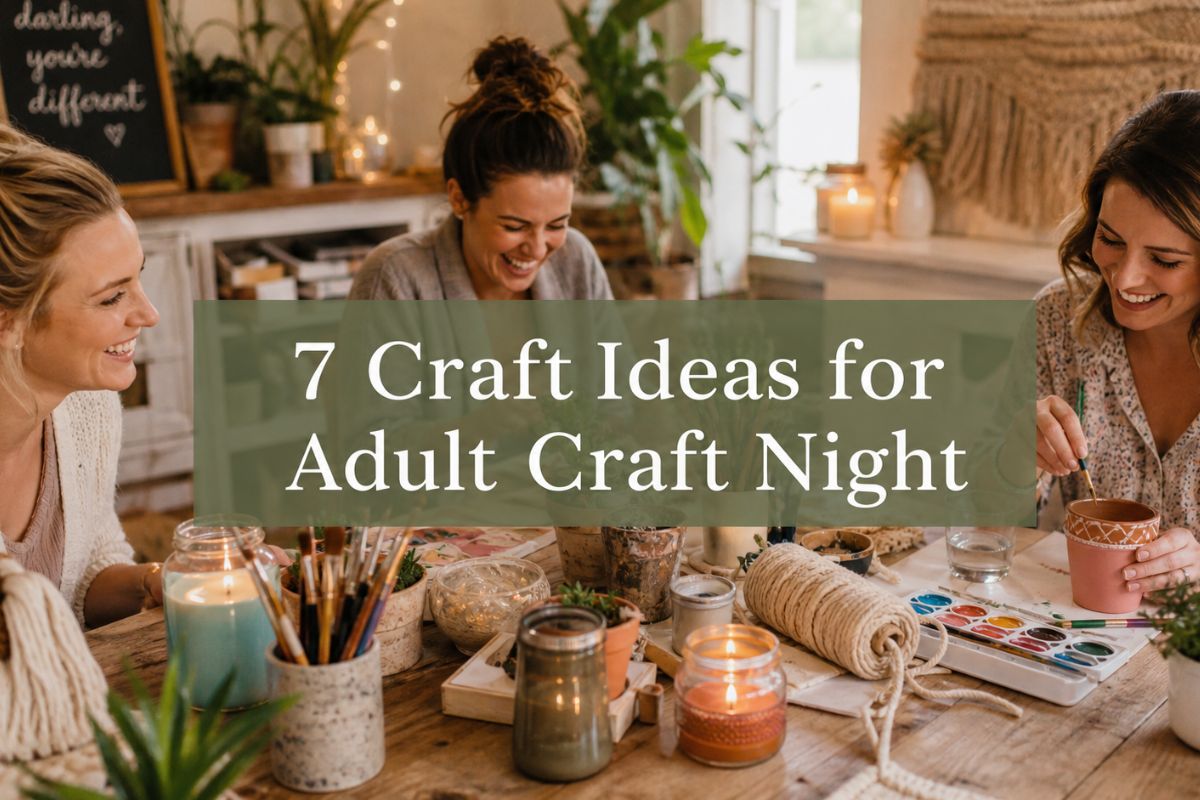
Craft ideas for adult craft night have come a long way from the popsicle sticks and glitter glue of elementary school. These days, adult craft nights are a full-on event: good music, your favorite snacks, people you actually want to spend time with, and a project that leaves you feeling genuinely proud of what you made.
There’s something really special about carving out time to be creative with people you love. No scrolling, no obligations, no pressure to be productive in the usual way. You show up, you make something with your hands, and you leave feeling like a completely different version of yourself.
Whether you’re planning your first ever craft night or looking for fresh ideas to keep things interesting, this list has something for every skill level and every kind of crew. No experience necessary. Seriously.
What You Might Need
As an Amazon Associate, I earn from qualifying purchases. Some of the links in this article are affiliate links. This means that, at zero cost to you, I will earn an affiliate commission if you click through the link and finalize a purchase.
Before the fun begins, it helps to gather a few basics. Not every project on this list needs all of these, but having them on hand means you’re ready for anything.
- Acrylic paints and brushes in various sizes
- A hot glue gun and extra glue sticks
- Scissors, craft knives, and cutting mats
- Mod Podge or decoupage medium
- Blank canvases, wood slices, or terracotta pots
- Markers, paint pens, and fine liners
- Twine, ribbon, and washi tape
- Drop cloths or newspaper to protect your table
A little prep goes a long way when you’ve got a group of people ready to create.
Macramé Wall Hangings for a Boho Touch
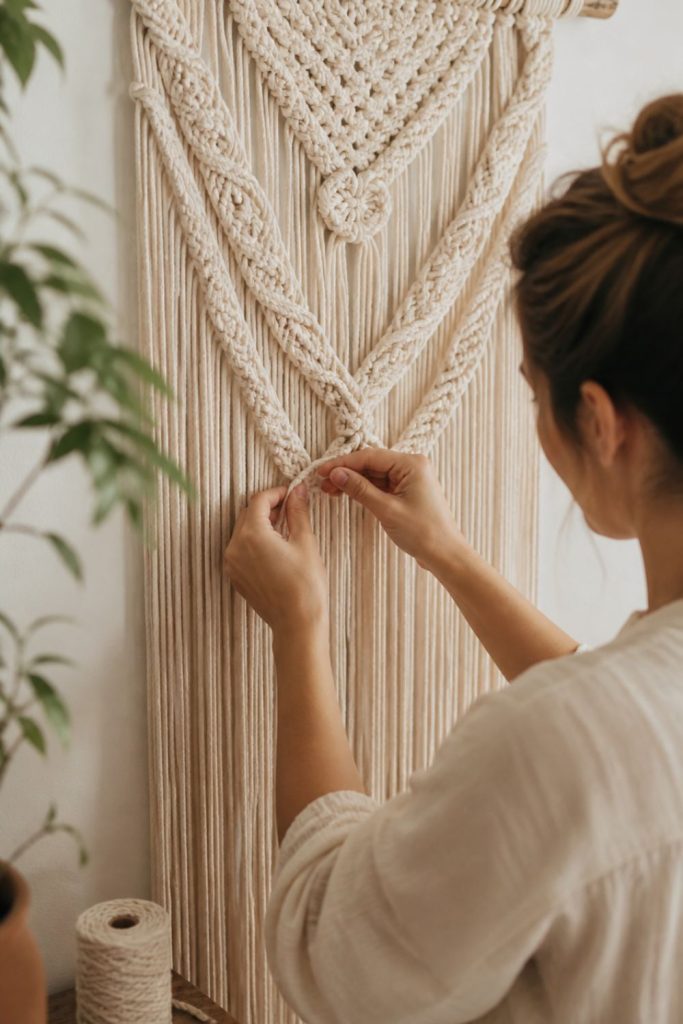
Macramé is having a serious moment, and for good reason. It looks incredibly impressive hanging on a wall, but the basic knots are surprisingly easy to learn in an evening. Your guests will leave feeling like fiber art pros, which is a fantastic feeling.
You’ll want a dowel rod or a thick branch, some natural cotton macramé cord, and scissors. That’s genuinely it. Look up a simple square knot tutorial before the night, or pull one up on a shared screen so everyone can follow along together.
How to Style It:
- Cut cord lengths to about four times the desired finished length of your hanging.
- Fold each piece in half and attach it to the dowel using a lark’s head knot.
- Practice the square knot with a few test pieces before committing to the full project.
- Add wooden beads, feathers, or a fringe trim at the bottom for personality.
Shop It:
This macramé cord kit from Amazon has everything you need to get started and comes with enough cord for the whole group.
Painted Terra Cotta Pots for Every Plant Parent
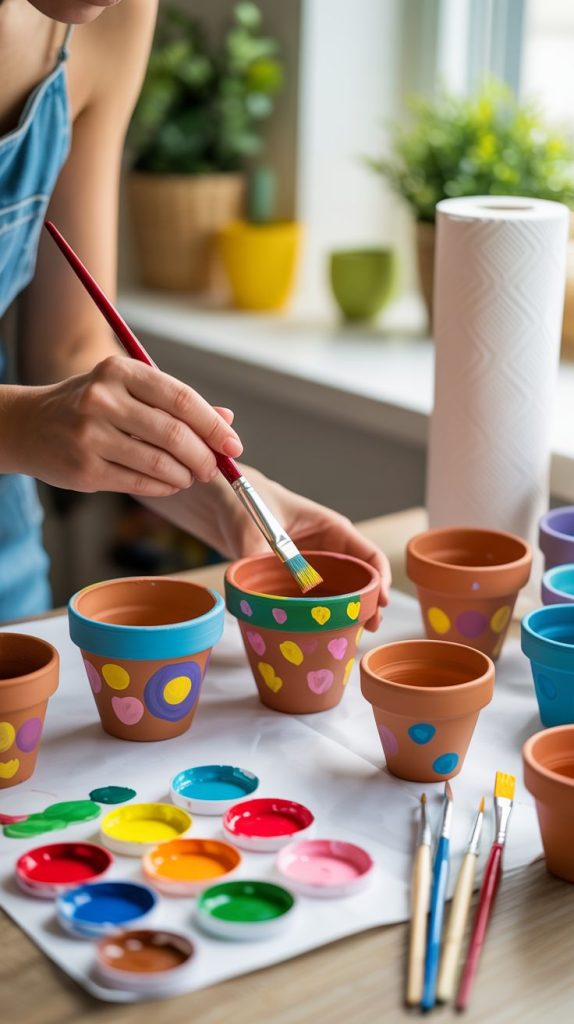
There is something endlessly satisfying about turning a plain terra cotta pot into something beautiful. This craft is perfect for mixed skill levels because you can go as simple or as detailed as you want. Some people do abstract swirls. Others attempt tiny botanical illustrations. Both look amazing.
Set up a paint station with small pots, acrylic paints, fine-tipped brushes, and a few cups of water for rinsing. Lay down some newspaper or a drop cloth because things will get colorful.
How to Style It:
- Seal the pot with a clear gesso or primer coat first so the paint adheres better and lasts longer.
- Try simple patterns like stripes, dots, checkerboard, or half-moon dip designs for a modern look.
- Use paint pens for fine details like lettering, tiny flowers, or geometric line work.
- Finish with a coat of Mod Podge or outdoor sealer if the pots will actually be used for plants.
Shop It:
This terra cotta pot and acrylic paint bundle from Amazon is the perfect all-in-one setup for a fun and colorful craft night.
Decoupage Serving Trays for a Custom Home Accessory
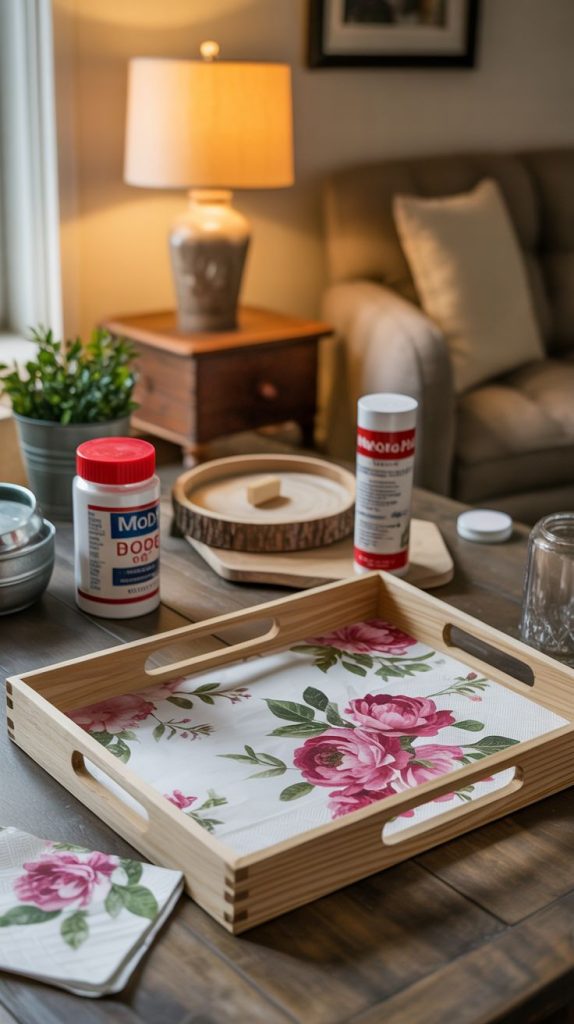
Decoupage is one of those crafts that sounds fancier than it is. You’re basically gluing paper to a surface and sealing it. The result looks like something you’d find in a boutique for $45, which makes it incredibly satisfying to make yourself.
Grab some plain wooden trays from the craft store, a stack of napkins with pretty patterns, decorative tissue paper, or pages from old books and magazines. Mod Podge is your best friend here.
How to Style It:
- Tear or cut your paper into irregular shapes rather than perfect squares for a more organic, layered look.
- Apply a thin layer of Mod Podge to the tray, press the paper down, and smooth out any bubbles gently with your fingers.
- Layer multiple papers and let each layer dry before adding the next.
- Finish with two or three coats of Mod Podge on top to seal everything and give it a polished finish.
Shop It:
Grab this wood tray set from Amazon and add Mod Podge so you’ll have everything you need to make a tray that looks like it came from a boutique.
Resin Coasters for a Genuinely Stunning Result
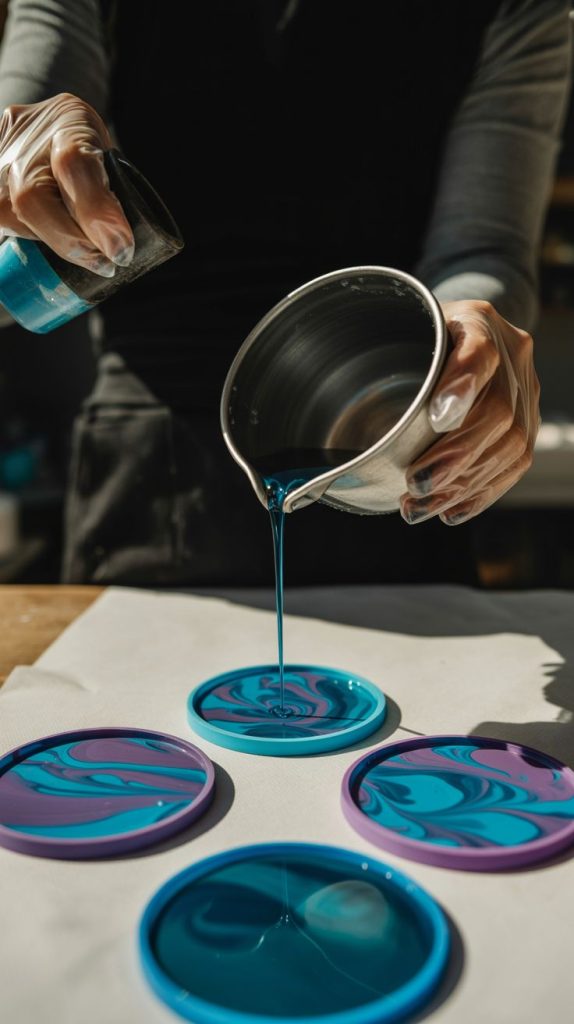
Resin crafts feel a little intimidating at first, but coasters are the perfect beginner resin project. They’re small, the stakes are low, and the finished product looks absolutely gorgeous. This one does require a bit of planning since resin needs to cure overnight, so guests take their coasters home to reveal the next day.
You’ll need a resin kit, silicone coaster molds, alcohol inks or mica powder for color, and a heat gun or a lighter to pop air bubbles. Set up good ventilation and have gloves ready for everyone.
How to Style It:
- Mix your resin according to the package instructions and divide it into small cups before adding color.
- Drop in alcohol ink in two or four colors and swirl gently with a toothpick for a marbled effect.
- Pour into your molds slowly to avoid creating extra bubbles.
- Use a heat gun or lighter held a few inches above the surface to pop any remaining bubbles before the resin sets.
Shop It:
This resin kit and silicone coaster mold set from Amazon is beginner-friendly and comes with everything you need for a stunning finished piece.
Hand-Lettered Wooden Signs for Wall Art You’ll Actually Want To Keep
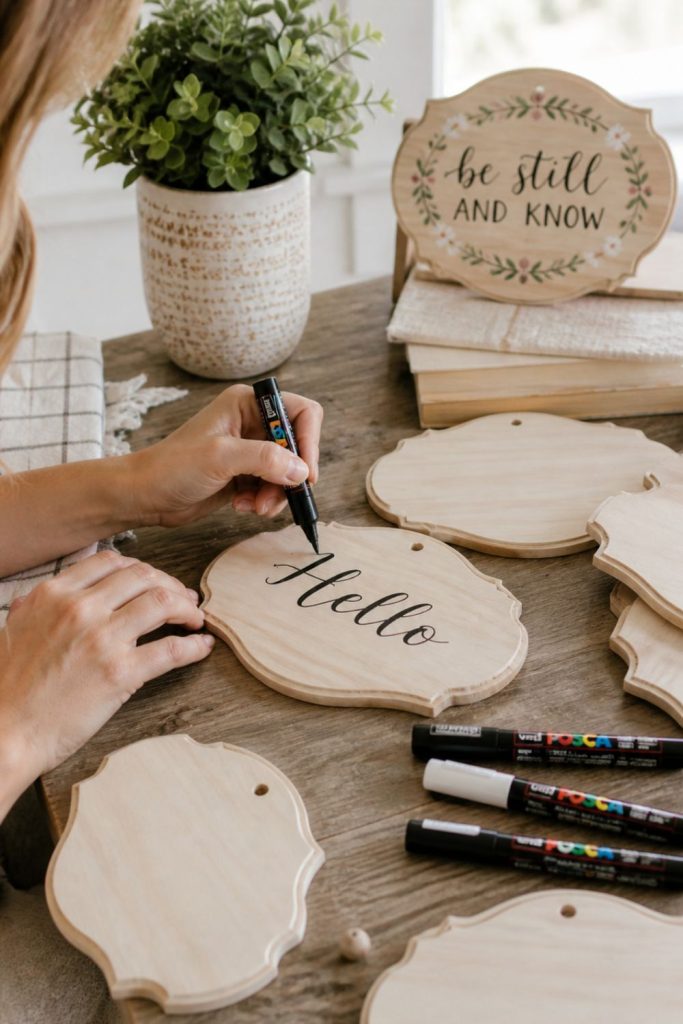
Hand lettering looks intimidating, but with a little practice and the right tools, almost anyone can create something they’re proud to hang on their wall. Wooden signs are the perfect canvas because they’re affordable, easy to find, and come in every shape and size.
Pick up some unfinished wood plaques, wood stain or chalk paint for the background, and paint pens or chalk markers for the lettering. Print out a few simple phrases ahead of time so guests can trace them onto the wood with transfer paper if they want a little extra help.
How to Style It:
- Stain or paint the wood base first and let it dry completely before adding any lettering.
- Use a pencil to lightly sketch your phrase or trace it with graphite transfer paper.
- Go over the lettering with a paint pen in a contrasting color, working slowly and steadily.
- Add small illustrated details around the text like tiny florals, stars, or geometric borders for extra charm.
Shop It:
Use wood signs that are blank and paint pen sets from Amazon to easily create something beautiful even if you’ve never tried hand lettering before.
Candle Making for a Craft Night Upgrade
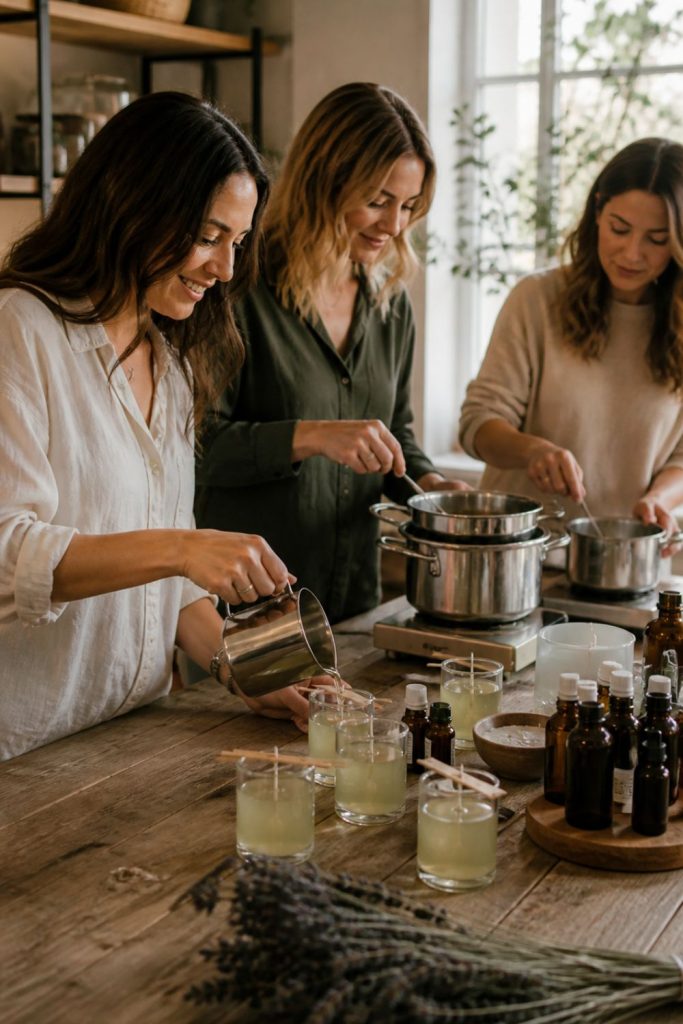
Candle making is one of those crafts that feels wildly luxurious for how approachable it actually is. Your guests get to choose their own scents, pick their containers, and walk away with something genuinely useful. Honestly, it might be the most popular craft night idea on this whole list.
You’ll need soy wax flakes, fragrance oils, wicks with tabs, containers like glass jars or tins, and a double boiler setup. Melt the wax, add fragrance, pour, and wait.
How to Style It:
- Hot glue wick tabs to the center of each container before pouring so they stay put.
- Use a chopstick or pencil balanced across the top of the jar to hold the wick upright while the wax sets.
- Add fragrance oil at around 185°F for best scent throw, roughly one ounce of fragrance per pound of wax.
- Let candles cure for at least 24 hours before burning for the best possible scent experience.
Shop It:
This soy wax candle making kit from Amazon has everything your group needs to pour, scent, and take home a candle they’ll actually burn and love.
Watercolor Painting for a No-Pressure Creative Session
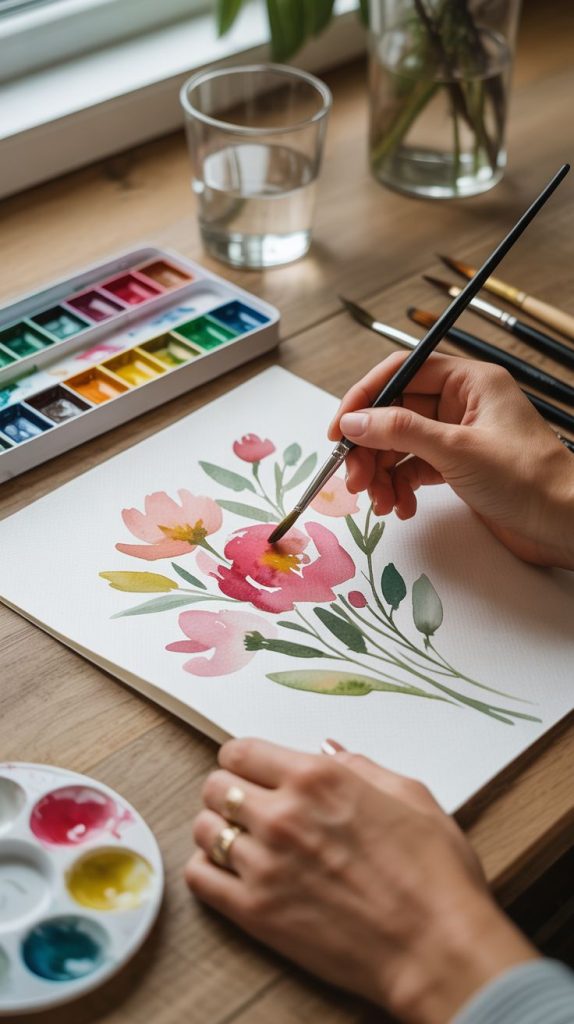
Watercolor is the most forgiving medium for a group of adults with varying levels of artistic confidence. Happy accidents become beautiful washes of color, and nobody’s painting has to look like anything in particular. That’s the whole point.
Set up each spot with a small watercolor palette, a set of brushes in different sizes, watercolor paper, a cup of water, and paper towels. Pull up some gentle music, maybe a guided tutorial on a shared screen, and let people create whatever feels right.
How to Style It:
- Start with a wet-on-wet technique by wetting the paper first before applying paint for soft, dreamy washes of color.
- Try simple subjects like abstract blooms, galaxies, leaf silhouettes, or landscape horizons.
- Encourage guests to experiment with salt sprinkled onto wet paint for a gorgeous crystallized texture effect.
- Frame the finished pieces before guests leave so they have something ready to hang the moment they get home.
Shop It:
This watercolor paper pad and paint set from Amazon is perfect for beginners and gives you everything you need for a relaxed and creative evening.
Make Your Next Craft Ideas for Adult Craft Night One to Remember
The best craft nights aren’t about perfection. They’re about showing up, trying something new, laughing at the messy parts, and walking away with something you made with your own hands. Craft ideas for adult craft night work best when everyone feels comfortable enough to experiment without pressure.
Set the mood with good lighting, clear your table space, and have everything prepped before guests arrive. The less time spent hunting for supplies, the more time everyone has to actually create. And honestly? That’s what it’s really about.
Frequently Asked Questions
What are the best craft ideas for adult craft night for beginners?
Watercolor painting, painted terra cotta pots, and decoupage trays are all fantastic starting points. They require minimal technique and the results look great even on a first try.
How do I choose a craft that works for a group of different skill levels?
Look for projects with a low barrier to entry but room to add detail for those who want a challenge. Painted pots and hand-lettered signs work beautifully this way.
How far in advance should I prep for a craft night?
Gather all your supplies at least two days ahead. Pre-measure anything that needs weighing, like resin or wax, so the night itself flows smoothly without interruptions.
Can I do resin crafts indoors?
Yes, but make sure the space is well-ventilated. Open windows, run a fan, and have nitrile gloves available for every person at the table.
What’s a good craft night supply budget per person?
Most of these projects run between $5 and $15 per person when you buy supplies in bulk. Candle making and resin tend to be on the higher end, while watercolor and terra cotta pots are very budget-friendly.
How long do most of these craft night projects take?
Most projects fit comfortably into two to three hours, which is the sweet spot for a craft night. Resin coasters are the exception since the curing happens overnight after guests leave.
Do I need to be artistic to enjoy adult craft night?
Absolutely not. The point is to have fun and try something new. Some of the most beautiful results come from people who insist they have no artistic ability whatsoever.
